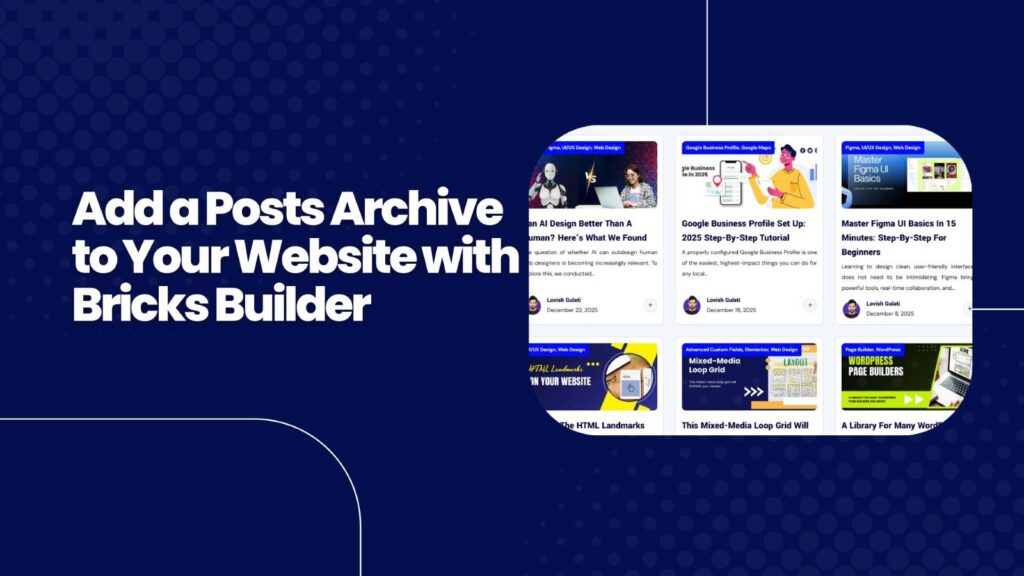
Putting a posts archive on your homepage is a great way to surface recent articles without building a separate blog page. Using Bricks Builder you can drop a post archive into a homepage section, style it to match the rest of your site, and control exactly which posts appear and how users navigate them. This guide walks through a simple, practical approach that focuses on fundamentals: preparing posts, placing the post widget, styling the archive, configuring queries and pagination, and understanding limitations so you know when to step up to the Loop Builder or a bespoke single post template.
Prepare your posts first
Before you build anything, make sure your posts are consistently formatted. Use the WordPress editor (classic or block) to keep content simple: title, body, image and an excerpt. Assign each post to a category and set a featured image. These small steps make dynamic widgets behave predictably and keep your archive tidy.
- Title and body: keep content in the editor, not in builder elements.
- Featured image: recommended for visual archives and grid layouts.
- Excerpt: useful for grid/list layouts so each card is concise.
- Categories: add descriptive categories (avoid names like “posts”) to filter and organise content.
Decide where the archive lives: homepage or dedicated archive template?
You can add a posts archive directly to the homepage using the Post widget, or build an archive template in Bricks and assign it to your posts archive. Both work, but there are differences:
- Homepage Post widget: quick and flexible for one-page sites. Great when you want a compact archive below other sections like a contact form.
- Archive template: use this if you want a dedicated archive page with access to Bricks archive-specific elements (taxonomy lists, author archives, etc.).
If you create an archive template, Bricks shows archive-specific items in the template builder. When placing a posts widget on a normal page, you still have the same core features, but they appear under general widget controls rather than the archive tab.
Drop in the Post widget and set up the basics
Duplicate a section if needed, then insert the Post widget into a container. Immediately set global styling such as typography and colours so the widget inherits the correct look for the section background.
- Typography: set a white or dark colour depending on background contrast.
- Layout: choose Grid, List, Masonry or Metro. Grid is the most reliable; Masonry works if you have mixed image ratios; Metro is more eclectic.
- Columns & spacing: three columns with a 30px gap is a common starting point for desktop.
Use the first-item feature to highlight your latest post
The Post widget includes a neat option to make the first item stand out — for example full width while the rest remain in a grid. This is an easy way to push your latest or featured content without creating multiple archives and complex offsets.
Fields and dynamic content
Fields determine what shows on each card. Typical choices include title, excerpt, image, date, author and a read more link. Add fields by clicking the plus sign in the widget and selecting dynamic data where necessary.
- Date and author: useful metadata. The date format may need adjusting in your WordPress settings or with a custom format.
- Read more: add it as a field if you want a consistent CTA on each card.
- Styling per field: you can set background colours, padding and typography for each field independently to achieve card-like designs.
Tip: avoid adding too many fields. Keep each card readable and consistent. If you need precise vertical alignment of buttons across cards, be aware of a limitation: the built-in Post widget cannot reliably align “read more” buttons to the same baseline when excerpt lengths vary. For that level of control you will want to build a custom loop or use the Loop Builder.
Query controls: what posts show and in what order
The query panel is where you tell the widget which content to pull. You can choose post type, order by publish or modified date, set ascending or descending order, limit the number of posts, offset results and exclude specific posts or terms.
- Post count: limit how many posts are shown on the page to keep the layout tidy.
- Offset: useful when pairing two archives — for example one large featured item and a secondary grid that excludes that featured post.
- Taxonomy filtering: filter by category or tag to create targeted archives (for example showing only “Screens” category posts).
- Excluding terms: hide categories with no posts or remove individual posts from the output.
Pagination and filters
Enable pagination if you do not want to display all posts at once. If you set a smaller posts-per-page number than your total posts, pagination will appear and can be styled. Place the pagination at the bottom of the section for better UX.
For category filters, enable the filter option and choose which taxonomy to show. If a filter term has no posts it will still appear by default; exclude empty terms in the query or remove unused categories to avoid confusing users.
If pagination or items position themselves oddly, check the widget display setting under style → miscellaneous and set the display to block instead of flex. This often fixes alignment issues where items drift left or right.
When to use Loop Builder or a single post template
The Post widget is perfect for simple archives and fast builds. However, if you need pixel-perfect control — such as equal-height cards, bottom-aligned CTAs, complex post meta arrangements or a custom single post layout — move to the Loop Builder for the archive and build a dedicated single post template for individual posts.
The Loop Builder lets you design each repeatable item with full control, while a bespoke single post template ensures the full post view displays exactly the elements you want: hero image, author box, social shares, related posts and any bespoke layout.
Practical checklist before publishing
- Ensure each post has a featured image and an excerpt.
- Assign clean, meaningful categories and remove unused ones.
- Decide on Grid versus List and set column count and spacing.
- Configure query: post type, order, post count, any offsets or exclusions.
- Style fields individually: title, excerpt, read more, meta.
- Enable pagination if you do not want to expose all posts on a single page.
- Check responsiveness: reduce columns and adjust spacing for tablet and mobile.
Final notes
Adding a posts archive to the homepage is a straightforward way to keep content visible and drive engagement from the front page. Start simple with the Post widget, get your categories and featured images right, and then iterate: add filters, tweak queries and move to the Loop Builder when you need fine-grained control. Small decisions like excerpt length and featured image aspect ratio have a big impact on visual consistency, so standardise them early.
FAQ
How do I control how many posts show in the homepage archive?
Open the Post widget query settings and set the number of posts per page. If that number is lower than the total posts, enable pagination so users can navigate to the remaining posts.
Can I filter the archive by category or tag?
Yes. In the query settings choose taxonomy filtering and select the categories or tags you want to include. You can also exclude terms or specific posts.
Why are my read more buttons not aligned across cards?
The built-in Post widget cannot guarantee bottom-aligned buttons when excerpt lengths differ. Use the Loop Builder or build a custom archive item with equal-height containers if you need consistent button alignment.
Should I use Grid, Masonry or Metro layout?
Grid is the safest choice for consistent image sizes. Masonry works well when image heights vary and you want a Pinterest-style layout. Metro is more eclectic and best for magazine-style pages with diverse card sizes.
How can I highlight the latest post?
Use the first-item feature in the Post widget to make the first post full width or styled differently. Alternatively, create a separate archive for the featured post and offset the secondary archive by one.
Why is a category showing even though it has no posts?
By default filter lists may show all terms. Exclude empty terms in your query or remove unused categories to prevent empty filters from appearing.